LEDストリップライトが切断後に動作しなくなるのはなぜですか?
Lightstec (LED ストリップの専門メーカー) による実践ガイド
切断 LEDストリップライト これはカスタム インストールでは一般的な方法ですが、不適切な手法を使用すると誤動作が発生する可能性があります。大手 LED ストリップ工場として、当社は技術的な原因を説明し、お客様に実用的なソリューションを提供します。

主な理由と解決策
1.間違った切断点
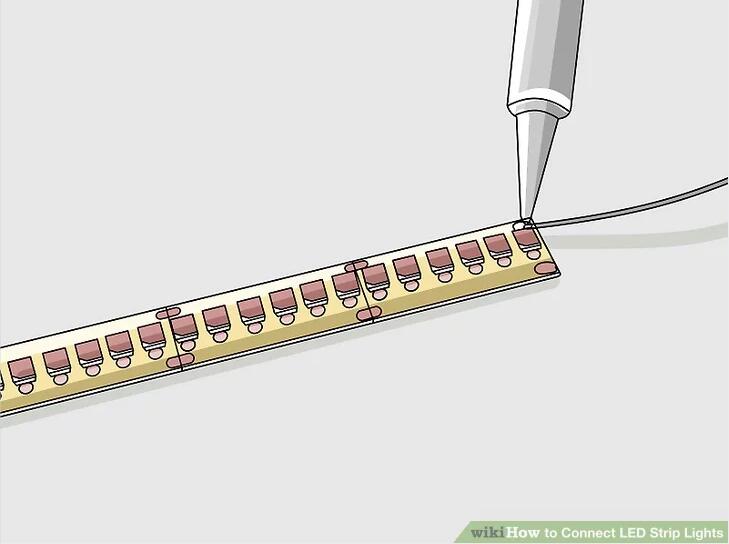
LEDストリップには、はさみのアイコン 3 ~ 6 個ごとの LED が安全な切断位置を示します。他の場所を切断すると内部回路が切断され、部分的または全体的な故障が発生します。
- ✅修理:
- 印を付けた箇所には鋭利なハサミや刃物を使用してください。
- 偶発的に切断した場合は、マルチメーターで導通をテストし、切断された接続をはんだ付けしてください。

2.回路の損傷または LED の焼け
切断すると銅パッドが露出し、酸化したり短絡したりする可能性があります。トリミング後に残りの LED を過負荷にすると、チップが焼ける可能性があります (黒い斑点として表示されます)。
- ✅修理:
- 切り口を絶縁してください液体電気テープ または熱収縮チューブ。
- 焼けた LED は一致する 3V チップをはんだ付けして交換するか、ワイヤーでバイパスします。
プ ライト メーカー")
イト メーカー")
� ライト メーカー")
��ト メーカー")
ープライト (4)")
� ライト メーカー")
3.電源の不一致
ストリップを短くすると電圧要件が変わります。例えば:
- 60 個の LED を備えた 12V/5m ストリップ = LED あたり 2.4V。
- 3m まで切断 (LED 36 個) = 12V/LED 36 個 = LED あたり 3.3V (チップの過負荷)
- ✅修理:
- 必要な電力を再計算します。
Required Voltage = (Number of LEDs) × 3V - ドライバーを に置き換えます。定電流モデル 新しい負荷に合わせます。
- 必要な電力を再計算します。
4.逆極性またはドライバーの故障
切断したストリップを +/- を逆にしたワイヤで再接続すると、LED が即座に損傷する可能性があります。ドライバーの欠陥 (コンデンサーの故障など) によっても、ちらつきや電力供給が停止される可能性があります。
- ✅修理:
- 再接続する前にマルチメーターを使用して極性を確認してください。
- テストドライバの出力電圧。故障または不安定な場合は交換してください。


5.はんだ付けやコネクターの不良
はんだ接合部が緩んでいたり、低品質のコネクタがあると抵抗が発生し、調光や断続的な障害が発生します。
- ✅修理:
- 使用する60/40ロジン入りはんだ 300℃で確実な接合を実現します。
- RGB ストリップには防水 4 ピン コネクタを選択してください。

Lightstec からの予防的なヒント
- 常にテストストリップを使用する 取り付ける前に 3V バッテリーを使用してください。
- 追加アルミニウムチャンネル 50% を超える短縮の場合は熱放散のため。
- ドライバーを使用する20% 高い容量 計算されたニーズよりも。
- 切断を避ける高圧(120V/220V) ストリップ - 代わりに損傷した部分を交換します。
よくある質問
Q: 切断したストリップをはんだ付けせずに再接続できますか?
A:はい!はんだなし 4 ピン コネクタ (RGB に最適) を使用しますが、銅パッドが汚れていないことを確認してください。
Q: 一部の LED が切断後も暗いままになるのはなぜですか?
A: 電圧降下が考えられます。をインストールします24V ストリップ または電力注入ポイントを追加します。
Q:切り口の防水方法は?
A: シリコーンゲルコネクタまたはエポキシ樹脂でシールします。
交換と修理の時期
- ✅修理可能: 軽度の火傷、マークされた箇所のきれいなカット、機能的なドライバー。
- ❌交換する: パッドの腐食、回路の焼け跡、または水による損傷。
Lightstecのプロフェッショナルサポート
工場直接のサプライヤーとして、当社は以下を提供します。
- 無料カッティングガイド そして電圧計算機。
- 大量注文向けのカスタム ドライバーとコネクタ。
- [[email protected]] による年中無休のテクニカル サポート。
OEM/ODM ソリューションが必要ですか? 【ライツテックへのお問い合わせ】 耐久性があり、サイズに合わせてカットされた LED ストリップには 5 年間の保証が付いています。


著者について
ジェリー・フー
Lightstec の創設者。工学の学位を取得。LED 照明ビジネスで 13 年以上の実務経験。LED 照明製品の製造に精通しています。このブログでは LED 照明の知識とソリューションを共有します。中国からの LED ライトの調達を歓迎します。
もっと詳しく知る 間違いを犯す前に教えてくれる人が少ない、プロ主導のクラス。